Understanding the Camera Crop Factor and How To Apply It
Note: This is a rather long and technical article. If you want to skip all the technical stuff, jump down to the “Summing Up” and “Action Plan” sections at the end to get a concise summary of the results and how to put them to use.
Recently, I was shopping for a new camera. I was considering both DLSR and Superzoom cameras.
Zoom was very important to me as one of my main purposes for getting a new camera was to photograph wildlife. My current cameras have only limited zoom and I am constantly frustrated because I can’t get close enough to the wildlife to get a good shot.
But when I started comparing cameras, I immediately got confused.
DSLRs designate their lenses in mm focal length. For example, 18mm, 140mm, 200mm, 300mm, etc.
Superzoom cameras, on the other hand, designate their lenses by zoom factor, which can range anywhere from about 35x to up to 83x on the new Nikon Coolpix P900 camera. These factors are based on the zoom from the lowest focal length of the camera to the longest focal length and can be quite misleading. For example, a 30x zoom on one camera can be quite different than a 30x on another camera, depending on the actual focal lengths used on each camera.
And these zoom values tell you almost nothing about how much objects will be magnified over what you see with your naked eye. I have a 4x zoom compact camera that magnifies only slightly over what I see with my naked eye. How disappointing is that?
As a result, these different designations make it extremely difficult to compare the different types of cameras and lenses.
What I really want to know is how much larger will a lens make an object appear over what I can see with my naked eye. That’s all.
Well, it took a long time, but I think I finally have it all sorted out.
Let’s see what all it all means.
Nomenclature:
Before we get started, let’s define some terms I’ll be using so we don’t get further confused. The following diagram helps to illustrate these terms.

● Scene: What is being photographed, either totally or in part. A scene may be a landscape, a portrait, a group of people, etc. and includes everything seen by the naked eye when looking from the same position that the camera is located.
● Image: The digital representation of a scene or portion of a scene produced by the sensor in a digital camera.
● Focal Length: The distance from the optical center of the lens to the sensor when the lens is focused on a scene at infinity. The focal length determines the size of the Field of View that is ● projected onto a given sensor. The longer the focal length, the smaller the Field of View.
● Field of View: The scene or portion of a scene that is projected onto a camera’s sensor when the diameter of the Image Circle equals the diagonal length of the sensor. The Field of View is what the sensor sees. The Field of View varies inversely with the focal length of the lens; the longer the focal length, the smaller the Field of View.
● Angle of View: The angle formed by rays extending from the optical axis of a lens at its optical center to the extremes of the Field of View. The angle of view varies with the focal length of the lens being used; the longer the focal length, the smaller the angle of view.
● Projection Circle: The circular cross section of the projection of the scene or portion of a scene included in the Field of View out from the lens. The Projection Circle is a general concept used to illustrate how the projected Field of View expands at increasing distances from the lens.
● Image Circle: The circular cross section of the projection of the scene or portion of a scene included in the Field of View onto a camera’s sensor by a lens. The diameter of the Image Circle is equal to the diagonal length of the sensor.
● Image Angle: The angle formed by rays extending from the optical axis of a lens at its optical center to each end of the camera sensor’s diagonal. The Image Angle varies inversely with the focal length of the lens being used. The Angle of View equals the Image Angle because they are opposite angles on two intersecting rays (see figure). The Image Angle is readily calculated from two known entities: the focal length of the lens being used and the diagonal length of the sensor being used. Thus, calculation of the Image Angle is used to establish the Angle of View for a given camera / lens combination.
● Crop: A portion of the scene isolated or cut out from the total scene.
● Object: A person or thing in a scene.
● Zoom Factor: The largest focal length of a zoom lens divided by its smallest focal length.
● Magnification Factor: The size of an object seen through the viewfinder of a camera divided by the size of the object as seen by the naked eye from the exact same position. In an image captured by the camera, the object will be magnified by the Magnification Factor.
The 35mm Reference:
As will be discussed later, the sensor size of a camera affects both the magnification and crop of images. Thus, when photographing the same scene with the same focal length lens, different cameras will give quite different results.
Therefore, to be able to compare cameras and lenses, you need a common reference point and the 35mm camera has been selected by the industry to be that reference. This is because the 35mm camera was widely used in the days of film and is very familiar to many photographers.
Today’s full frame cameras have the same sensor size (36.00 x 24.00mm) as a 35mm camera. Thus, full frame equivalents and 35mm equivalents are the same thing.
To apply this reference, you need to know the 35mm equivalent focal length for the lens you are using. Then, when you photograph the same scene from the same position with different cameras using lenses having the same 35mm equivalent focal length, you should get the same result.
Knowing how to calculate the 35mm equivalent focal length for a camera / lens combination and how to use the results are the focus of this article. For now, suffice it to say that knowing how to do this is critical to being able to compare lenses and cameras in a meaningful way.
The 35mm reference also allows us to use the extensive history of 35mm cameras to categorize lenses based on their focal lengths. The most common lens categories are summarized in the following table.
Table 1. Types Of Lenses Categorized By Their 35mm Equivalent Focal Lengths
| Lens Type | 35mm Equivalent Focal Length |
| Ultra-Wide Angle | 13 – 21 |
| Wide Angle | 24 – 35 |
| Normal | 40 – 50 |
| Portrait | 85 – 105 |
| Telephoto | 135 – 210 |
| Long Telephoto | 300 – 800 |
| Very Long Telephoto | 1200 |
Camera Sensor Sizes:
Sensors are the electronic devices inside a camera that collects the light from the lens and turns it into a digital image. A sensor, therefore, is the electronic equivalent of film.
Sensor size varies over a wide range between cameras. Generally, similar types of cameras have the same size sensor, which is consistent between manufacturers.
There are two main reasons for the different sensor sizes. The first is cost. The larger the sensor, the more it costs to make it. Thus, to keep prices down, less expensive cameras use smaller sensors.
The second reason is the Magnification Factor that can be achieved with the smaller sensors. The theory behind the Magnification Factor will be discussed shortly, but it is this Magnification Factor that makes superzoom cameras possible. Using small sensors, cameras can achieve outrageous Magnification Factors with small, relatively inexpensive lenses.
In addition to magnification, sensor size can affect several other camera performance characteristics including image quality, maximum usable ISO levels (low light performance), and background blur. Thus, when shopping for a camera, it is important to know the sensor size for any cameras you are considering and to understand how a given sensor size will affect performance. The remainder of this article will delve into many of these effects, especially the Magnification Factor.
The followng table gives the most common sensor sizes and the types of cameras they are used in.
Table 2. The Most Common Sensor Sizes and Where They Are Used
| Sensor Designation |
Sensor Dimensions (mm) |
Cameras Used In |
| Full Frame, 35mm | 36.00 x 24.00 | High-end DSLRs |
| APS-C (Nikon) | 23.60 x 15.60 | Nikon, Sony, Pentax and other entry to mid-level DSLRs, mirrorless cameras |
| APS-C (Canon) | 22.20 x 14.80 | Canon entry and mid-level DSLRs |
| Micro Four Thirds (MFT) | 17.30 x 13.00 | Smaller mirrorless cameras |
| 1-Inch | 12.80 x 9.60 | High-end compact cameras and high-end highzoom cameras |
| 1/1.7″ | 7.60 x 5.70 | Compact cameras |
| 1/2.3″ | 6.17 x 4.55 | Compact, zoom, and superzoom cameras |
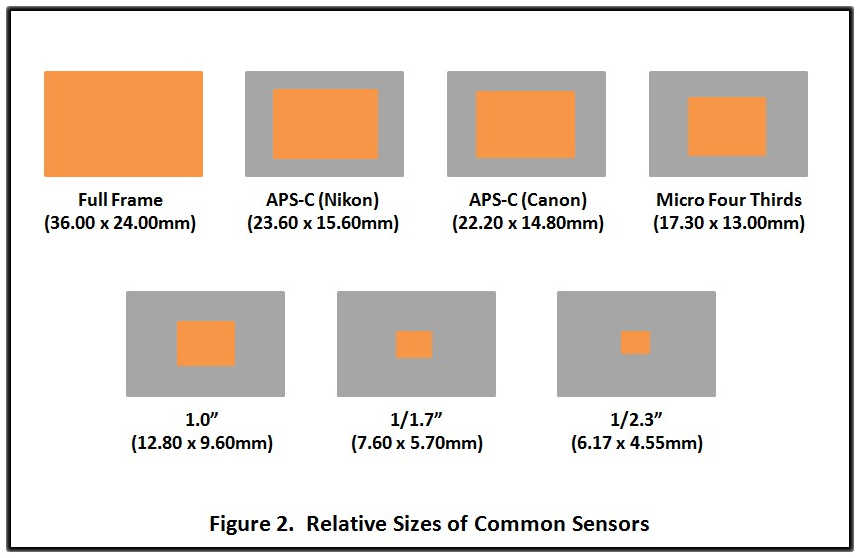
The following figure compares the relative physical sizes of the above sensors.
The Camera Crop Factor:
The Crop Factor is defined as the relative size of a camera’s sensor to that of a full frame, 35mm sensor. The sensors diagonal lengths are used to compare the sensor sizes.
The crop factor is calculated as follows:
CF = d35 / dsensor
where
CF = Crop Factor
d35 = Diagonal length of the 35mm, full-frame sensor, mm
dsensor = Diagonal length of sensor being compared, mm
The following table gives the dimensions, diagonal lengths, aspect ratios, and crop factors for some of the most common sensor sizes.
Table 3. Dimensions, Diagonal Lengths, Aspect Ratios, and Crop Factors For the Most Common Sensor Sizes
| Sensor Designation |
Sensor Dimensions (mm) |
Sensor Aspect Ratio |
Sensor Diagonal Length (mm) |
Sensor Crop Factor |
| Full Frame, 35mm | 36.00 x 24.00 | 3:2 | 43.27 | 1.00 |
| APS-C (Nikon) | 23.60 x 15.60 | 3:2 | 28.29 | 1.53 |
| APS-C (Canon) | 22.20 x 14.80 | 3:2 | 26.68 | 1.62 |
| Micro Four Thirds (MFT) | 17.30 x 13.00 | 4:3 | 21.64 | 2.00 |
| 1-Inch | 12.80 x 9.60 | 4:3 | 16.00 | 2.70 |
| 1/1.7″ | 7.60 x 5.70 | 4:3 | 9.50 | 4.55 |
| 1/2.3″ | 6.17 x 4.55 | 4:3 | 7.67 | 5.64 |
As an example, using the above information, the crop factor of a 1/2.3″ sensor can be calculated as follows:
CF1/2.3 = d35 / d1/2.3 = 43.27 / 7.67 = 5.64
Sensor Crop:
Sensor Crop refers to the reduced amount of a scene captured by a smaller sensor verses a larger one when using the same focal length lens.
That is, for a given focal length lens, a smaller sensor will capture only a portion of the scene captured by a larger sensor.
This is illustrated in the figure below where a full frame and a Micro Four Thirds (MFT) sensor are compared using an Osprey as the object being photographed.
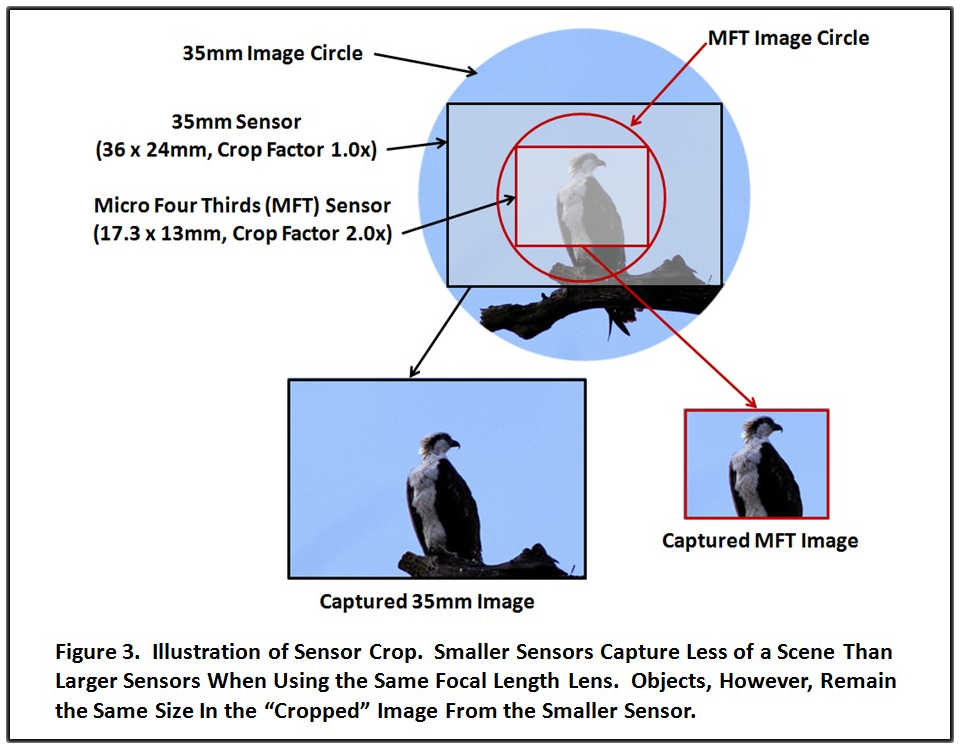
This figure shows a 35mm sensor (36 x 24mm) with its Image Circle superimposed with a smaller Micro Four Thirds (MFD) sensor (17.3 x 13mm) and its Image Circle. The resulting images are what you would get if you took the same photograph, standing in the same place, and with the same focal length lens on two different cameras, one with a 35mm sensor and the other with a MFT sensor.
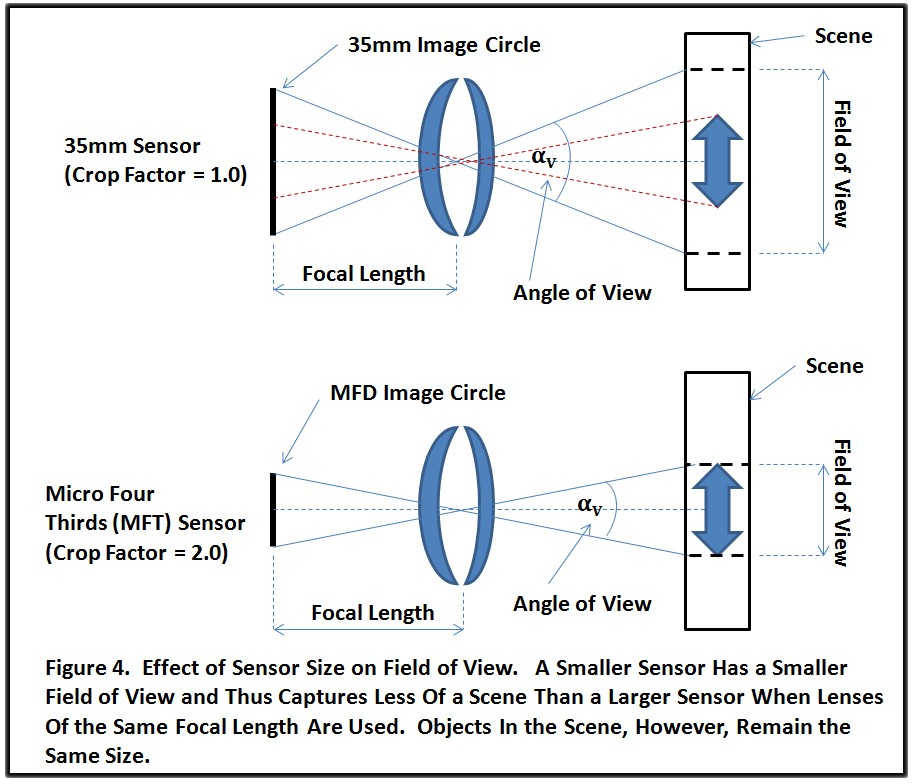
Because the 35mm sensor is bigger, it has a larger Image Angle and thus a larger Angle of View, a larger Field of View and captures more of the scene. The smaller MFD sensor has a smaller Image Angle, a smaller Angle of View and a smaller Field of View and, thus, captures less of the total scene. This effect is illustrated in the following figure which compares the Field of View, Angle of View, and the Image Circle for a 35mm sensor versus a Micro Four Thirds (MFD) sensor at the same focal length.
This behavior of the smaller MFT sensor to capture less of a scene is called cropping because part of the scene is cut out, or “cropped” out versus what is captured on the larger 35mm sensor.
There is nothing magical about cropping. It is the digital equivalent of taking a pair of scissors and cutting around the red box representing the MFT sensor in the Osprey figure above. You then keep whatever is in the red box and discard the rest.
An important thing to note about the cropping process is that the size of the object in the cropped image from the smaller sensor does not change. It is the same size as in the 35mm image. No magnification has occurred. Just cropping. You see less of the object, but the object size has not changed.
Sensor Magnification:
This is where things get very confusing for many people. But, sensor magnification is really quite simple.
When an image is captured by a camera, its initial size will be that of the sensor. All of its pixels will be compressed into that size.
When an image is used, however, its size is adjusted to match a standard output size. For example, a standard printed output size might be 4″ x 6″, 5″ x 7″, or 8″ x 10″. Normalizing the output size in this way has the effect of enlarging the image from a small sensor more than a larger one. How much more is given by the crop factor of the sensor.
This is illustrated in the following figure, again looking at our Osprey photo.

Thus, sensor magnification is a result of software processing to enlarge the image to a standard output size. It is not done through the lens or optics. It is nothing more than digital enlargement of the image. And when the image is enlarged, the objects in the image are also enlarged.
The amount of additional enlargement needed for an image from a small sensor to equal the size of an image from the standard, full frame, 35mm sensor at any given output size is equal to the crop factor of the sensor.
Sensor magnification is very important because it is what makes superzoom cameras possible. By using smaller lenses and smaller sensors, superzoom cameras can achieve incredible reach. And it is all due to sensor magnification.
The 35mm Equivalent Focal Length:
As noted earlier, the 35mm sensor size has been established as the standardized reference for digital cameras.
To apply the reference, 35mm equivalent focal lengths must be calculated for each camera / lens combination when smaller sensor cameras are used. In this way, the performance of smaller sensor cameras will be standardized to that of the 35mm camera, thus allowing direct and meaningful comparisons of virtually any camera / lens combination.
The 35mm equivalent focal length is calculated by multiplying the focal length of the lens being used by the Crop Factor of the camera the lens is being used on. That is:
f35eq = f lens* Camera Crop Factor
where
f35eq = 35mm Equivalent focal length, mm
fLens = focal length of lens being used, mm
This relationship is derived below using a 50mm lens with a Micro Four Thirds (MFT) sensor having a Crop Factor of 2.0 as an example:
In the figure below, (αI) is the Image Angle on the 50mm sensor. As noted earlier, the Angle of View (αV) is equal to the Image Angle (αI) because they are opposite angles on two intersecting rays, as shown in the diagram. The complete Field of View is projected onto the sensor and the diameter of the Image Circle on the MFT sensor is equal to the length of the MFT sensor diagonal.
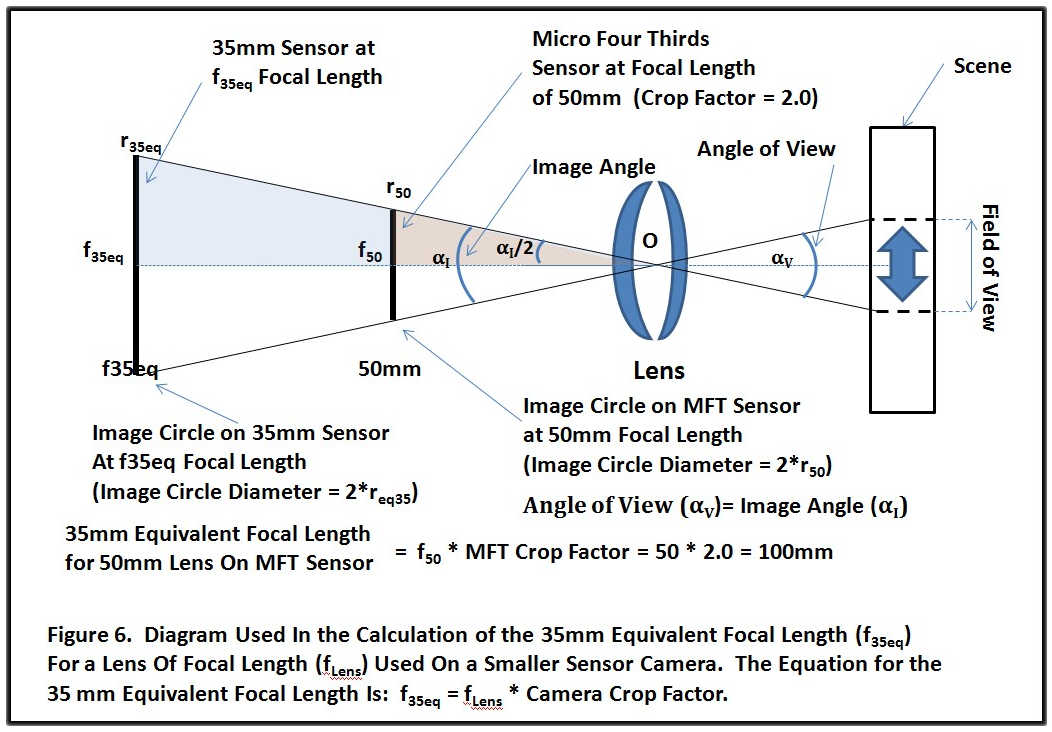
For the 35mm equivalent focal length (f35eq), what we are looking for is the focal length at the same Angle of View where the Field of View just fills the sensor and where the diameter of the Image Circle on the 35mm sensor just equals the diagonal length of the 35mm sensor.
r50 represents the radius of the Image Circle at a focal length of 50 mm and equals half the diagonal length of the MFT sensor. Likewise, r35eq is the radius of the 35mm Image Circle at focal length (f35eq) and equals half the diagonal length of the 35mm sensor.
Based on the geometry of the right triangle O-f50-r50,
Cotan(αI/2) = f50 / r50 = 50 / r50
and, therefore,
r50 * Cotan(αI/2) = 50
The Crop Factor of the MFT sensor is defined as:
MFT Crop Factor = Diagonal 35mm Sensor / Diagonal MFT Sensor
Therefore,
Diagonal 35mm Sensor = Diagonal MFT Sensor * MFT Crop Factor
This same relationship will hold for the radii of the two Image Circles which are equal to half of their respective sensor diagonals. Therefore,
Radius 35mm Image Circle = Radius MFT Image Circle * MFT Crop Factor
and
r35eq = r50 * MFT Crop Factor = r50 * 2.0
In right triangle O-f35eq-r35eq,
Cotan(αI/2) = f35eq / r35eq
and
f35eq = r35eq * Cotan(αI/2)
Substituting in r35eq = r50 * 2.0 from above yields:
f35eq = r50 * 2.0 * Cotan(αI/2) = [r50 * Cotan(αI/2)] * 2.0
Since, as determined earlier, r50 * Cotan(αI/2) = 50mm, this equation becomes…
f35eq = 50mm * 2.0 = 100mm
Thus, in this example, f35eq = fMFT * MFT Crop Factor .
In generalized terms, the equation for the 35mm equivalent focal length (f35eq) becomes:
f35eq = fLens * Crop Factor
Standardizing focal lengths on the 35mm sensor in this way means that every camera / lens combination that yields a given 35mm equivalent focal length will produce the same image (i.e. have the same field of view) as an actual lens of that same focal length used on a 35mm camera.
For example, an 18mm lens on a 1/2.3″ sensor camera (Crop Factor=5.6), a 50mm lens on a Micro Four Thirds camera (Crop Factor=2.0), and a 100mm lens used on an actual 35mm camera (Crop Factor=1.0) will all yield the same image.
Without the standardized 35mm reference, such meaningful comparisons would be impossible.
The Naked Eye Equivalent Focal Length:
For me, the most meaningful way to compare zoom cameras and lenses would be based on their magnification from what I see with my naked eye and not the magnification from the smallest focal length of the lens to the largest focal length, which is how superzoom camera lenses are rated.
To do this, one needs to know the focal length of the lens that produces an image in the viewfinder where objects are the same size as the naked eye perceives them to be.
Researching this on the Internet, it is generally agreed that a 50mm lens is the eye-equivalent focal length. However, the claims were largely based on the 50mm lens being “normal” where the focal length roughly equaled the Image Circle diameter of a 35mm lens and thereby gives images with image perspective very close to that of the human eye. This is different than the focal length giving eye-equivalent object sizes.
As a result of the lack of information on the eye-equivalent magnification focal length, I set out to determine this value for myself. I did this in two ways.
Fist, I did some empirical measurements. I took two of my cameras, which are compact cameras with small sensors, adjusted the zoom until the size in the viewfinder of a square object on my bookcase on the other side of the room was approximately the same size as my naked eye perceived it to be and took a picture at that setting. I then uploaded the pictures to my computer, loaded them my photo editor, and read the focal length used for each shot from the image’s EXIF data. Finally, I calculated the 35mm equivalent focal length using the Crop Factor for each camera. The results were as follows where the measured focal lengths are the average of three measurements:
Table 4. Empirical Measurement Results For the 35mm Equivalent Focal Length That Gives Eye-Equivalent Object Sizes
| Camera | Sensor Type |
Sensor Dimensions (mm) |
Sensor Diagonal (mm) |
Crop Factor |
Measured Focal Length (mm) |
Measured 35mm Eq. Focal Length (mm) |
| Fuji Finepix 4900Z | 1/1.7″ | 7.44 x 5.58 | 9.30 | 4.65 | 21.2 | 96.10 |
| Olympus C720UZ | 1/2.7″ | 5.312 x 3.984 | 6.64 | 6.52 | 14.7 | 98.42 |
| AVERAGE | 97.24 |
Note: Sensor dimensions were taken from the camera’s user manuals
Based on these tests, a focal length of 97mm is indicated to give an eye-equivalent view of objects.
Next, I calculated the 35mm equivalent focal length of the human eye.
The human eye is very complex and any attempt to equate it to a simple lens system must be considered an approximation at best. However, that’s all I wanted; an approximation as a reality check on my empirical measurements.
In the eye, the central area of the retina, the macula, has the densest concentration of photo receptors and provides our central field of vision. This is the part of our vision that is in good focus. The remainder of the retina provides our peripheral vision, which is not in good focus. Thus, I took the macula to be the equivalent of the sensor in a camera.
The macula is about 6mm across. Assuming a square, the diagonal length would be 8.48mm which gives a crop factor of 43.27 / 8.48 = 5.1.
There are two commonly accepted focal lengths of the eye, 17mm and 22mm. The latter value was determined from physical refraction in the eye and is generally considered the more accurate value.
Using a focal length of 22mm and the calculated Crop Factor of 5.1, the 35mm equivalent focal length is 112mm. This value is in reasonable agreement with the value of 97mm I measured empirically with my compact cameras, thus giving me confidence in those measurements.
Based on my findings, I’ve selected 100mm as the approximate 35mm equivalent focal length of the human eye.
Magnification Factor of a Lens / Camera Combination:
Now that the approximate 35mm equivalent focal length of the human eye has been established, it can be used to calculate the magnification factor for a given lens / camera combination. This is done by dividing the 35mm equivalent focal length of the lens / camera combination by 100, the estimated 35mm equivalent focal length of the human eye. That is:
MX = f35eq / 100
where MX is the Magnification Factor.
For example, a lens having a 35mm equivalent focal length (f35eq) of 200mm will have a Multiplication Factor of 2.0x. The 200mm focal length is twice as long as the approximate 35mm equivalent focal length of 100mm for the human eye and doubling the focal length will double the size of objects in the Field of View, thereby making them twice as big as viewed by the naked eye.
This relationship holds because, for any given sensor, increasing the focal length of a lens will result in a proportional magnification of the objects in the scene being photographed. This effect can be explained in two ways.
The first way is the more accepted way but is a little more difficult to visualize.
As the focal length of a lens is increased for a given sensor size, the Angle of View is decreased, resulting in a smaller Field of View (i.e. a smaller portion of the scene) being projected onto the sensor. Since the Image Circle size (i.e. the image projection area) remains constant, projecting a smaller Field of View and expanding it to fill the same projection area will cause any objects in the scene to be magnified. This effect is illustrated in the following figure.

To understand this mathematically, we need to calculate the size of the Field of View for each focal length above. The size of objects in the image will then vary inversely with the change in Field of View.
Since we don’t know the distance from the camera to the scene, we can’t calculate the absolute values of the Fields of View but we can calculate relative Fields of View, which is all we really need.
In the diagram above, L is the distance from the lens to the scene and is the same for the two lenses.
P50 represents the distance from L to P50 and is half the Field of View with the 50mm lens.
Likewise, P100 represents the distance from L to P100 and is half the Field of View with the 100mm lens.
First we calculate the value of the Field of View for the 50mm lens, as follows:
For right triangle O-f50-r50,
Tan(αI50/2) = r50 / f50
The radius of the Image Circle is equal to half the diagonal length of the 35mm sensor used in this example and is given by r50.
For a 35mm sensor, the diagonal is 43.27mm. Therefore, r50 = 43.27 / 2 = 21.64 and
Tan(αI50/2) = r50 / 50 = 21.64 / 50 = 0.4328
Now, we move on to the Field of View. Referring to right triangle O-L-P50,
Tan(αV50/2) = P50 / L
and
P50 = L*Tan(αV50/2)
Since αV50 = αI50, αV50 /2 = αI50 /2 and Tan(αV50/2) = Tan(αI50/2) = 0.4328.
Therefore,
P50 = L*0.4328 = 0.4328*L
The Field of View for the 50mm lens (FOV50) is then:
FOV50 = 2*P50 = 0.866*L
In similar fashion, we calculate the Field of View for the 100mm lens:
From right triangle O-f100-r100,
Tan(αI100/2) = r100 / f100
Again, r100 is the radius of the Image Circle on a 35mm sensor and is thus equal to half the sensor diagonal, or 21.64mm. Thus,
Tan(αI100/2) = 21.64 / 100 = 0.2164
From right triangle O-L-P100,
Tan(αV100/2) = P100 / L
and
P100 = L*Tan(αV100/2)
Since αV100 = αI100, αV100 /2 = αI100 /2 and Tan(αV100/2) = Tan(αI100/2) = 0.2164.
Therefore,
P100 = L*0.2164 = 0.2164 * L
and
FOV100 = 2*P100 = 0.433*L
Thus, the Field of View at 100mm is half that at 50mm. Therefore, objects contained in the 100mm Field of View will be enlarged by a factor of 2x over what they were in the 50mm image when they are projected onto the sensor in the Image Circle.
Stated another way, the magnification factor is given by the ratio of the Fields of View:
Mx = FOV50 / FOV100 = (0.866*L) / (0.433*L) = 2.0
Another, more intuitive way of looking at this effect is to look at the size of the Projection Circle as a function of focal length.
An increase in the focal length will result in a proportional increase in the diameter of the Projection Circle for a given Field of View and a similar increase in the size of any objects in the Field of View being projected. Thus, if you double the focal length, you will also double the diameter of the Projection Circle and will double the size of any objects within that Field of View.
This effect is illustrated in the following diagram.

Here (αI) represents the Image Angle on the sensor at 25mm where the Field of View completely fills the sensor and the diameter of the Projection Circle equals the length of the sensor diagonal. In this case, the Image Circle equals the Projection Circle on the plane of the sensor.
rP50 represents the radius of the Projection Circle for that same Field of View at a focal length of 50 mm. Likewise, rP100 is the radius of the Projection Circle at a focal length of 100 mm.
Based on the geometry of the right triangle O-f50-rP50,
Tan(αI/2) = rP50 / 50
and
rP50 = 50*Tan(αI/2).
In the same way, for right triangle O-f100-rP100,
Tan(αI/2) = rP100 / 100
and
rP100 = 100*Tan(αI/2).
Since the value of Tan(αI/2) remains constant, doubling the focal length from 50mm to 100mm also doubles the radius of the Projection Circle from 50*Tan(αI/2) to 100*Tan(αI/2). Because the radius equals half the diameter, the diameter, of the Projection Circle is also doubled.
The same increase in size will hold true for any objects in the Field of View. Doubling the focal length will double their size.
So what are the magnification factors for some of today’s popular cameras? Let’s find out.
The magnification factor for a 300mm lens on a Nikon D3400 DSLR Camera with a Crop Factor of 1.5 is calculated to be 4.5x.
A Nikon Coolpix B700 Superzoom Camera with a 35mm equivalent focal length of 1445mm has a magnification factor of 14.4x. When adding on its 4x digital zoom, the Magnification Factor jumps to 57.6x.
For the Nikon Coolpix P900 Superzoom Camera with its industry leading 2000mm 35mm equivalent focal length, the Magnification Factor is 20x, which jumps to an incredible 80x with its 4x digital zoom.
Using this technique, I finally have a way to compare cameras and lenses in a way that is meaningful to me.
Background Blur:
Background blur is a creative factor used by many photographers.
When photographing a person, wildlife, a pet, etc., you typically want the object you are photographing to stand out against the background. In controlled situations, such as a photographic studio, custom backgrounds are used for this purpose.
In uncontrolled situations, however, such as out in the field when photographing wildlife, we cannot always control what is in the background. In such cases, the background can be distracting if it is in sharp focus.
To produce a more pleasing background, it is often desirable to blur the background making it appear as a uniform or nearly uniform color. This helps the object you are photographing to stand out.
This is illustrated in the following figure.

Background blurring is most often achieved by using a lens with a shallow depth of field. Typically, this is done by using a large aperture such as F2.8 or lower. As a general rule, the larger the aperture, the shallower the depth of field.
Focal length also plays a role in background blurring. For a given aperture, the shorter the focal length of the lens, the shallower the depth of field and the greater the background blurring.
To estimate the background blurring on a smaller sensor camera, you must once again compare it to the 35mm reference. You do this by calculating the 35mm equivalent F-Stop as follows:
The genral formula for F-Stop is:
F = f / D
where
F = F-Stop
f = Lens focal length, mm
D = Lens aperture diameter, mm
The 35mm equivalent F-Stop is the F-Stop that would be present on a full-frame, 35mm camera with a lens having the 35mm equivalent focal length of the lens being compared along with the same aperture as the lens being compared.
For a small sensor camera, the 35mm equivalent focal length is longer than the actual focal length of the lens being used. Thus, the 35mm equivalent F-Stop becomes:
F35eq = f35eq / DLens = (fLens * Camera Crop Factor) / DLens = (fLens / DLens ) * Camera Crop Factor
But,
fLens / DLens = FLens
Therefore,
F35eq = FLens * Camera Crop Factor
Where,
F35eq = 35mm Equivalent F-Stop
f35eq = 35mm Equivalent focal length, mm
fLens = Focal length of lens being used, mm
DLens = Aperture Diameter of lens being used, mm
FLens = F-Stop of lens being used
For example, using a F2.8 F-Stop on a 1/2.3″ sensor camera with a 5.6 Crop Factor would be equivalent to F16 on a 35mm camera (2.8 * 5.6). Thus, even though you are using a large aperture on your lens, you will not achieve much background blurring. This is one of the trade-offs of using a small sensor camera. You get fantastic magnification but poor background blurring.
Finally, it must be pointed out that the 35mm equivalent F-Stop only affects depth of field, and thus background blurring, and not the amount of light passing through the lens. The actual F-Stop is not affected. Thus, the exposure does not have to be adjusted for the 35mm equivalent F-Stop.
ISO Noise:
ISO is a measure of the sensitivity of a digital camera’s sensor to light. Increasing ISO increases the sensitivity and higher ISO values are used when shooting in low light situations when a flash cannot be used.
In practice, the sensitivity of a camera sensor is increased by increasing the gain; that is, the amount of amplification applied to the raw signal coming from the sensor. Thus, increasing the ISO setting increases raw signal amplification.
Therefore, there are two important signal outputs from a camera sensor: The raw signal output coming directly from the sensor as a result of light (photons) hitting it and the amplified signal where the ISO amplification has been applied to the raw signal to make it stronger for subsequent electronic processing.
ISO values typically increase in a geometric progression (power of 2) such that each higher value makes the sensor twice as sensitive to light. That is, each value is equal to one stop in exposure. Typical ISO values are:
50, 100, 200, 400, 800, 1600, 3200, 6400, 12,800, 25,600, 51,200
Older cameras were limited to maximum ISO values of 400 or 800. Today’s cameras can typically go up to 3,200 or 6,400 and many modern DSLRs can reach 25,600 or even 51,200, allowing them to capture images in near darkness.
The issue with high ISO values is digital noise, which is exhibited as graininess in the resulting image.
Digital noise is an inherent property of electronic chips, such as used in camera sensors, and is something that can never be completely eliminated.
The best way to combat noise is to produce a strong raw (unamplified) output signal and thus, a high signal-to-noise ratio because it is ultimately the raw signal-to-noise ratio that determines the amount of noise in a digital image.
However, in low light situations, the amount of light impinging on the sensor decreases, causing both the sensor’s raw output signal and the signal-to-noise ratio to decrease. In these situations, the ISO value is increased so that the image can be captured and a usable amplified output signal produced, but the low signal-to-noise ratio will introduce noise into the final image.
Because the raw output signal strength of a sensor is determined by the total amount of light hitting it, raw output signal strength is affected by sensor size. Smaller sensors will give smaller raw output signals. Thus, in order to compare the digital noise in images from different cameras and sensor sizes, we must once again use the 35mm reference. This is done by calculating the 35mm equivalent ISO value, as follows:
For a camera sensor, the signal-to-noise ratio is given by the following equation:
SNR = PT / SQRT(PT)
Where,
SNR = Signal-to-Noise Ratio
PT = Total Number of Photons of Light Impinging On the Sensor
As can be seen, the only thing that affects the signal-to-noise ratio is the total amount of light hitting the sensor. Thus, for two different sized sensors to have the same signal-to-noise ratio, the total amount of light hitting the two sensors (PT) must be the same.
For any given sensor, the total amount of light hitting the sensor (PT) will be the photon flux hitting the sensor in photons per unit area per second (PA) multiplied by the total area of the sensor (ASensor) and the time the shutter is open (t). That is:
PT = PA * ASensor * t
where
PT = Total light hitting the sensor over time (t), Photons
PA = Incident photon flux on the sensor, Photons/mm2 -sec
t = Time that the shutter is open and light is allowed to hit the sensor, seconds
The 35mm equivalent total amount of light (PT35eq) is equal to the total amount of light that would be hitting a 35mm sensor at the same photon flux (PA) as is hitting the camera’s smaller sensor.
To calculate the 35mm equivalent total amount of light, multiply the total amount of light hitting the smaller sensor by the area ratio of the 35mm sensor to the smaller sensor. That is:
PT35eq = PTSensor * A35 / ASensor
where
PT33eq = The 35mm equivalent total amount of light, Photons
PTSensor = The total amount of light hitting the smaller sensor, Photons
A35 = Area of a 35mm sensor, mm2
ASensor = Area of the smaller sensor, mm2
Since the size ratio of a given sensor to the 35mm reference sensor is given by the Crop Factor, the area ratio is given by the square of the Crop Factor. Thus:
PT35eq = PTSensor * (Camera Crop Factor)2
In simplified terms, the amplified signal strength from a given sensor can be thought of as being determined by multiplying the total light hitting the sensor (PTSensor) by the ISO value where, as mentioned earlier, ISO is essentially an amplification factor. In this way, the general formula for amplified signal strength becomes:
AmpSignalSensor = ISOSensor * PTSensor
The 35mm equivalent amplified signal strength is the amplified signal strength that would be produced by a 35mm sensor at the same ISO setting and the same photon flux as on the smaller sensor and is given by:
AmpSignal35eq = ISOSensor * PT35eq = ISOSensor * PTSensor * (Camera Crop Factor)2
Rearranging yields:
AmpSignal35eq = [ISOSensor * (Camera Crop Factor)2 ] * PTSensor
Note that this equation for the 35mm equivalent amplified signal strength is based on PTSensor so that the signal-to-noise ratio is the same on the two sensors. Thus, [ISOSensor * (Camera Crop Factor)2 ] is the amplification factor needed to produce the 35mm equivalent amplified signal strength from the raw output signal of the smaller sensor (PTSensor).
The product [ ISOSensor * (Camera Crop Factor)2 ] is an important parameter and is referred to as the 35mm equivalent ISO value. That is:
ISO35eq = ISOSensor * (Camera Crop Factor)2
The 35mm equivalent ISO value (ISO35eq) is our reference value and is defined as the ISO value that would be needed to amplify the raw output signal from a given smaller sensor (PTSensor) to give the 35mm equivalent amplified signal strength with the same signal-to-noise ratio as the smaller sensor.
Since the resulting signal-to-noise ratios are the same for the two sensors, the amount of noise in the final images produced by the sensors will be the same because noise is determined by the signal-to-noise ratio.
By using the 35mm equivalent ISO reference, we can now directly compare the performance of different cameras having different sensor sizes in a meaningful way.
As an example, an ISO value of 800 on a 1/2.3″ camera with a 5.6 Crop Factor will give the same amount of digital noise as a 25,600 ISO value on a 35mm camera. This demonstrates another trade-off when using a small sensor camera in that a given ISO value will introduce more noise than the same ISO value used on larger sensor cameras.
Finally, it should be noted that the 35mm equivalent ISO value only addresses noise in the final image. Exposure is not affected so no exposure adjustments are needed based on the 35mm equivalent ISO value.
Note: I believe Tony Northrup was the first to propose the (Camera Crop Factor)2 relationship for the 35mm equivalent ISO value and has verified the relationship using data from DxOMark.com. You can read Tony’s article here.
Print Size:
Print size is another factor that must be considered when selecting a camera.
If all you want to do is post your images on the Internet, or print out 4″ x 6″ or 5″ x 7″ prints, then print size won’t be an issue in your camera selection.
However, if you want to make prints of 11″ x 17″ or larger for framing or to make posters, then you must take this into account when selecting a camera.
This is because the magnification needed to produce large print sizes can add graininess to your images. The smaller the sensor in the camera, the sooner graininess will become an issue.
Magnification works by enlarging the pixels and eventually, at some point, the pixels will become visible and make the image look grainy. This happens with images from all cameras, no matter the sensor size or the number of Megapixels. It’s not a question of if, it’s a question of when.
Since images from small sensor cameras have to be magnified more to achieve a given print size, it only follows that graininess will show up in smaller print sizes than from images produced on larger sensor size cameras.
One review of the Nikon D3400 camera with a crop factor of 1.5 stated that the camera could produce an excellent 30″ x 40″ print at ISO 100. (Nikon D3400 Review.doc) This would equate to a 45″ x 60″ print on a full frame, 35mm camera.
Typically, images produced from a small 1/2.3″ sensor with a crop factor of 5.6 have a recommended maximum print size of 8″ x 10″ before graininess becomes a problem. This would equate to a 30″ x 37″ on a Nikon DX camera with a 1.5 crop factor, which is in good agreement with the number given in the D3400 review article mentioned above. This would represent a 45″ x 56″ print size on a full frame, 35mm camera.
Based on the above information, 60″ is taken as the 35mm equivalent maximum print size for the long side of the print.
Thus, to estimate the largest print size that can be produced from a given camera, where graininess is not an issue in the print, divide 60 by the crop factor of the camera. This gives the longest side of the print. To get the shorter side, multiply the longer print side just calculated by the inverse of the sensor’s aspect ratio. Aspect ratios for the most common sensor sizes are given in Table 3 in “The Camera Crop Factor” section of this article. Here are the equations:
Max Longer Print Side (inches) = 60 / Camera Crop Factor
Max Shorter Print Side (inches) = Max Longer Print Side * (1 / Sensor Aspect Ratio)
As an example, for a MFT camera with a crop factor of 2.0 and an aspect ration of 4:3, the longer print side would be 60 / 2 = 30″. The shorter side is given by 30 * 1/(4/3) = 30 * (3/4) = 23″. Thus, the largest, grain-free print size for a MFT camera is estimated to be 30″ x 23″.
It should be noted that this calculation is based on a low ISO value of 100. At higher ISO values, graininess will become an issue at smaller print sizes.
As a rough estimate, you can use the following formula to calculate the maximum print size at ISO values greater than 100. Here, 35mm equivalent ISO values are used in the calculations.
Max Longer Print Side (inches) = x / Camera Crop Factor
Max Shorter Print Side (inches) = Max Longer Print Side * (1 / Sensor Aspect Ratio)
where
x = 360.17 * ISO35eq-0.362
The equation for (x) was derived from the information in the Nikon D3400 review mentioned earlier.
As an example, consider an MFT camera with a crop factor of 2.0 and an aspect ratio of 4:3 using a 35mm equivalent ISO value of 800. Here, x = 360.17 * 800-0.362 = 32.0. The Max Longer Print Side = 32 / 2.0 = 16″. The Max Shorter Print Side = 32 * (1 / 4 / 3) = 32 * (3 / 4) = 24″. Thus, the maximum print size for a MFT camera at 35mm equivalent ISO 800 is estimated to be 32″ x 24″.
In addition to ISO, there are four other factors that can affect print size that should also be considered.
The first is the Megapixel (MP) resolution of your camera. In general, the more Megapixels you have, the larger the print you can make.
The second factor is that modern digital cameras are getting better and better at reducing noise. This has allowed modern DSLRs to use ISO values up to 51,600, a truly incredible value. As camera get better, acceptable print sizes will get larger and larger.
The third factor is blur introduced by camera shake. Even minute amounts of blur can ruin images at large print sizes. Use faster shutter speeds and learn how to hold your camera rock steady and you will produce sharper pictures that will allow you to produce larger print sizes.
The final factor is viewer distance away from a print. The farther away from a print you are, the sharper it looks and the less graininess is an issue.
The above calculations for maximum print sizes are for close-up viewing of an image. If you hang a print on the wall and view it from across the room, larger print sizes can definitely be used than calculated using the above methods.
As a general rule of thumb, for 8MP or higher cameras at low-to-medium 35mm equivalent ISO values, images will look acceptably sharp if viewed from a distance equal or greater than the print’s longer dimension. Thus, for a 24″ x 30″ print, stand at least 30 inches away and it should look good.
At higher 35mm equivalent ISO values or for low MP cameras (down to about 3MP), viewing distances of twice the longest dimension are needed to get acceptable sharpness.
Image sharpness is a subjective value. Do some trials and see what works with your camera for your application.
Summing Up:
Cameras and lenses are expensive, so when you want to purchase new equipment, you must do the research so you can make an informed decision. Otherwise, you might spend hundreds or even thousands of dollars but wind up a very unhappy camper.
Key factors that need to be considered when selecting a camera or lens are as follows:
● How much zoom magnification is desired?
● Is low light performance critical?
● Is background blurring critical?
● Will large prints be needed?
Using the information in this article, you now have all the tools needed to select the equipment that will best meet your needs.
For example, superzoom cameras can be great fun and highly useful for photographing wildlife and as an all-purpose camera to take on trips. However, these cameras use small sensors to achieve their high Magnification Factors, so it is important to understand the tradeoffs you make with these sensors so that you won’t be surprised or disappointed with certain aspects of their performance
Here is a concise summary of the key points and calculations discussed in the article:
● Use the 35mm equivalent focal lengths when comparing cameras and lenses
● Use the magnification factor and not the zoom factor when comparing cameras and lenses
● Calculations:
o Crop Factor:
■ Divide the diagonal length of a 35mm sensor by the diagonal of a smaller sensor of interest
● Camera Crop Factor = Diagonal35mm / DiagonalSenso
o 35mm Equivalent Focal Length (f35eq):
■ Multiply your camera’s focal length by its Crop Factor to get the 35mm equivalent focal length
● f35eq = fLens * Camera Crop Factor
■ All lens / camera combinations giving the same 35mm equivalent focal length will have the same Field of View and will give the same final image when photographing the same scene from the same position.
o Magnification Factor (Mx):
■ Divide the 35mm equivalent focal length by 100
● Mx = f35eq / 100
■ The Magnification Factor tells how much bigger an object will appear in the final image versus how big it appears to the naked eye when viewed from the same position
■ 100mm is the approximate 35mm lens focal length that gives an image having objects about the same size as viewed by the naked eye from the same position. This value was determined empirically.
o 35mm Equivalent F-Stop (F35eq):
■ Multiply your lens’ F-Stop by your camera’s Crop Factor to get the 35mm equivalent F-Stop
● F35eq = FLens * Camera Crop Factor
■ The 35mm equivalent F-Stop is the F-Stop that would be present on a full-frame, 35mm camera with a lens having the 35mm equivalent focal length of the lens being compared along with the same aperture as the lens being compared
■ Equivalent 35mm equivalent F-Stops will give equivalent depths of field and equivalent background blurring
■ The 35mm equivalent F-Stop only affects depth of field and background blurring and not exposure. Therefore, no adjustments to exposure are needed.
o 35mm Equivalent ISO Value (ISO35eq):
■ Multiply your camera’s ISO value by its Crop Factor squared to get the 35mm equivalent ISO value
● ISO35eq = ISOSensor * (Camera Crop Factor)2
■ The 35mm equivalent ISO value is the ISO value needed to give the 35mm equivalent amplified signal level from a 35mm sensor with the same signal-to-noise ratio as the amplified signal from a smaller sensor. Equivalent signal-to-noise ratios give equivalent noise in images produced by different sensors.
■ The 35mm ISO values only affects the amount of noise in the final image and not exposure. Therefore no adjustments to exposure are needed.
o Maximum Grain-Free Print Size at ISO 100:
■ Max Longer Print Side (in) = 60 / Camera Crop Factor
■ Max Shorter Print Side (in) = Max Longer Print Side * (1 / Sensor Aspect Ratio)
o Maximum Grain-Free Print Size at 35mm equivalent ISO Values Over 100 (Rough Estimate):
■ Max Longer Print Side (in) = x / Camera Crop Factor
● x = 360.17 * ISO35eq-0.362
■ Max Shorter Print Side (in) = Max Longer Print Side * (1 / Aspect Ratio of Sensor)
● Calculation Nomenclature (Terms Used In the Above Equations):
Diagonal35mm = Diagonal length of the 35mm, full-frame sensor, mm
DiagonalSensor = Diagonal length of sensor being used, mm
f35eq = 35mm Equivalent focal length, mm
fLens = Focal length of lens being used, mm
Mx = Magnification factor for the camera / lens combination being used
F35eq = 35mm Equivalent F-Stop
FLens = F-Stop of lens being used
ISO35eq = 35mm Equivalent ISO value
ISOSensor = ISO value for camera sensor being used
● Here are the calculated values for some of today’s popular cameras:
Table 5. Summary of the Key Parameter Values For Some Popular Cameras
| Camera | Lens Focal Length (mm) |
Sensor Type |
Sensor Size (mm) |
Crop Factor |
Max. 35mm Eq. Focal Length (mm) |
Max. Magnification Factor |
| Nikon D3400 DSLR | 18 – 55 and 70 – 300 |
APS-C (Nikon) |
23.60 x 15.60 | 1.5 | 82 and 450 | 0.82 and 4.5 |
| Canon EOS Rebel T6 DSLR | 18 – 55 and 75 – 300 |
APS-C (Canon) |
22.20 x 14.80 | 1.6 | 88 and 480 | 0.88 and 4.8 |
| Nikon Coolpix B700 Superzoom | 4.3 – 258 | 1/2.3″ | 6.17 x 4.55 | 5.6 | 1,445 | 14.4 |
| Nikon Coolpix P900 Superzoom | 4.3 – 357 | 1/2.3″ | 6.17 x 4.55 | 5.6 | 2,000 | 20.0 |
| Canon PowerShot SX60 HS Superzoom | 3.8 – 247 | 1/2.3″ | 6.17 x 4.55 | 5.6 | 1,383 | 13.8 |
Action Plan:
Here is your Cerebral Advantage Action Plan for selecting new cameras and lenses.
Step 1: Define your intended use for the new equipment. What will you be photographing most? Where will you be using the equipment most, indoors or outdoors? What type of lighting will be involved? How much magnification, if any, will you need? How will you be using your photographs? What size prints are you going to need?
Step 2: Define and prioritize the features you want in your new equipment (Magnification Factor, low light performance, price, etc.). Categorize each feature as a want or need.
Step 3: Use online resources and identify candidate cameras and/or lenses that can meet your needs.
Step 4: Identify the sensor type and dimensions for all candidate cameras, including any that you already own if you are looking to purchase a new lens for the camera.
Step 5: Calculate the Crop Factor for all cameras under consideration.
Step 6: For all camera / lens combinations, calculate the 35mm equivalent focal length of the lens. For zoom lenses, calculate the 35mm focal length for both the minimum and maximum focal lengths of the lens.
Step 7: For all camera / lens combinations, calculate the Magnification Factor at the maximum focal length of the lens.
Step 8: For all camera / lens combinations, calculate the 35mm equivalent F-stop for your lens at its smallest F-stop (widest aperture).
Step 9: For all candidate cameras, calculate the 35mm equivalent ISO value at ISO 100, ISO 400, ISO 800, and ISO 3200.
Step 10: For all cameras, calculate the maximum estimated print size that would have acceptable quality from a noise perspective at ISO 100.
Step 11: Review all calculated values along with the price of each candidate camera or lens and rank each camera / lens combination in terms of how it meets your prioritized list of wants and needs. Every camera / lens combination will have tradeoffs, so make sure you fully understand those tradeoffs and how they will affect performance.
Step 12: Select the equipment that best meets your needs.
Online Resources:
Below are some online resources where you can get good, in-depth reviews of camera equipment, pricing information, informative articles on photography and free user manuals for Nikon and Canon cameras and lenses. Use these resources, and others that you identify, to get the specifications and performance capabilities of all cameras and lenses you are considering.
Also, be sure to download the user manuals for all of the equipment you are looking at. These manuals contain a wealth of information and provide a complete description of every feature of the camera or lens.
This list represents only a small fraction of the online photography resources available but provides a good starting point for your research.
● DPReview.com/: A highly respected site that gives camera and lens reviews and side-by-side comparison of the features of a wide range of cameras. Also has good discussion forums including the “Nikon Coolpix Talk” forum.
● Amazon.com — Pricing information on virtually any camera or lens. Customer reviews also provide good information on people’s experiences with the equipment.
● KenRockwell.com — Excellent, in-depth reviews of cameras and lenses. Also includes great photographs showing the capabilities of all types of cameras and lenses.
● Nikon User Manuals: http://downloadcenter.nikonimglib.com/en/
● Canon User Manuals: https://www.usa.canon.com/internet/portal/us/home/support/camera-user-manual
Think Right. Live Well.
THIS ARTICLE MAY CONTAIN AFFILIATE LINKS. PLEASE SEE OUR AFFILIATE DISCLAIMER FOR MORE INFORMATION


No Comments